|
One of
the main tasks is the installation of the vent stack, which is included
with all units.
The vent
kits included in the shipping carton are sufficient for installation
in most single story buildings. If more is needed they are normally
easy to find. All vent pipes are thinwall PVC.
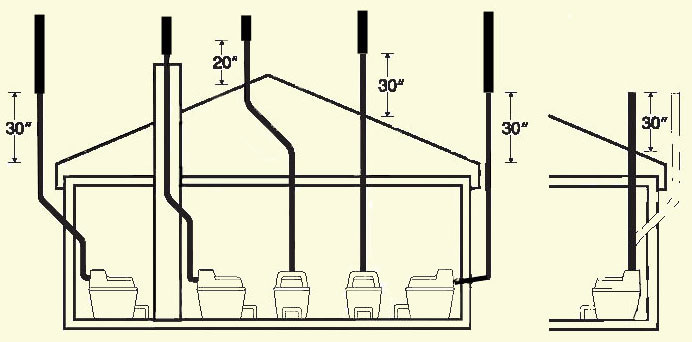
The drawing
at left illustrates some of the more common vent stack configurations
for self-contained system installations.
Electric units with 2" stacks should have the minimum number
of bends, should use 45° elbows where possible,
and should not have bends totalling more than 360°.
-
3" SpaceSaver/Ecolet Mobile vents and especially 4"
Non-Electric vent stacks should be installed as straight as possible.
If 45° elbows are needed in a 4" vent stack then a 12
Volt fan should be included in the installation to assist airflow.
Merging a Sun-Mar vent with other existing vents risks interference
and is not advised.
The diffuser included with all units is a simple but effective
device originally patented by Sun-Mar principals to aid updraft,
resist winter freeze-up, and protect the vent from downdraft and
weather.
As shown in the drawings they should be installed 2-3 feet above
the peak of the roof for best performance. This prevents downdraft.
Vent joints within the bathroom should be siliconed, vent joints
outside should be glued with CPVC glue.
It is very important that self-contained model vent systems do
not contain ANY horizontal runs or downward slopes on the pipe.
See the Winter Use section for
additional tips on protecting your vent stack in the winter
Detailed
Vent Stack Installation Instructions
Electric
Unit (2" and 3") Piping Installation
Piping
can be installed up the inside wall; through the wall at a slight
angle and up the outside wall. The choice depends on ease of installation,
visibility, and (especially if the toilet is to be used consistently
through a cold winter), the necessity of insulating all exposed vent
pipe.
Piping and fittings are of standard 2” PVC thin wall tubing.
Additional pipe or fittings are easily available should you need them,
from a building supply dealer. If you cannot find them near your location,
they are available in 30” lengths directly through us.
i) Minimize the number of sharp angles as each reduces vent efficiency.
If it is
necessary to have angles in the vent pipe, it is recommended that
45 degree angles are used whenever possible. (90 degree elbows may
be used as long as no horizontal vent results - pipe may be bracketed
at a slight upwards angle to prevent this)
ii) Do not lead the vent pipe downward or horizontally at any point.
This may lead to the vent pipe being blocked by condensate which would
cause a urine smell in your bathroom.
iii) All connectors in the vent pipe should be sealed. Use silicone
for the connection of the vent stack to the toilet in case the toilet
has to be moved or you have to access the fan. PVC cement may be used
in the rest of the stack installation if desired.
iv) All exposed vent pipe should be insulated with the foam insulation
supplied with the toilet. This is especially important for winter
or residential use.
Non-Electric
Unit (4") Piping Installation
Piping can be installed up the inside wall; through the wall at a
slight angle and up the outside wall (with this configuration a 12
volt fan is necessary). The choice depends on ease of installation,
visibility, and (especially if the toilet is to be used consistently
through a cold winter), the necessity of insulating all exposed vent
pipe.
Piping and fittings are of standard 4” PVC thin wall tubing.
Additional pipe or fittings are easily available should you need them,
from a building supply dealer. If you cannot find them near your location,
they are available in 30” lengths directly through us.
i) The vent stack should be installed as near to vertical as possible.
ii) Silicone caulking should be used for the connection of the vent
stack to the toilet because at some time the toilet may have to be
moved or your may wish to install a 12 volt fan in the vent stack.
iii) The Sun-Mar 12 Volt fan is fitted inside a 10” length of
4” vent pipe for easy installation, should it be needed. It is
installed by either cutting out a section of the vent immediately
above the composting unit, or by raising the vent stack off of the
composting unit and inserting the fan section. The fan can be used
with a solar panel and 12 volt battery, or by purchasing a 12 volt
adapter
from your local hardware store and simply plugging it into the wall.
iv) If a 12 Volt fan is installed it should operate continuously,
since otherwise it forms a partial blockage in the vent stack. To
install, you can either use PVC connectors or a rubberized connector.
v) All connectors in the vent pipe should be sealed.
Leading
the Vent Through The Roof (All Units)
As shown in the installation, the vent stack should end about 20”
above the peak of the roof so that it is less subject to downdraft.
Where the piping is taken through the roof, the roof flashing provided
may be used to seal the installation or if a new roof is being installed,
the roof flashing should be laid underneath the new roofing material.
DO NOT install horizontal sections of vent pipe to avoid leading the
vent through the roof.
The
Diffuser (All Units)
The diffuser provided with the unit is a simple device to be installed
at the top of the vent stack with the larger pipe protruding above
the smaller. The diffuser design encourages updraft, and discourages
wind and weather from going down the vent stack. Unlike wind turbines,
diffusers are less likely to freeze up in winter, and are more effective
in calm weather.
Back
To Self-Contained Unit Installation
|
|